VR Art Glass – wall art with a difference

Posted by Toni Collins | VR Art Glass - Projects | No Comments

If you have ever dreamed of living inner city in a well-appointed warehouse conversion – then the interior of this Collingwood residence will be worthy of a little green envy.

Originally the Sidchrome factory in another lifetime, Interior Designer Patricia La Torre of OUTSIDEINSIDE Building Elements has transformed the interior with aplomb.  The inclusion of a wall sized feature glass artwork in the kitchen area was one of her many recommendations.

“The design incorporated a glass feature panel to add a burst of colour and connect the inner city warehouse apartment to the streets of Melbourne”, said La Torre.

Another great use for VR Art Glass!

Visual Resource VR ART GLASS Collingwood nightshot

Factory warehouse conversion.
Architectural design by Robert Busselmann of Robert Busselmann & Associates.


Visual Resource VR ART GLASS Collingwood Install

The hard work… installation thanks to Glaziers Jasen & Dave.

Prize Winner Announced – Custom VR Art Glass or VR Artwork

Posted by Toni Collins | News & Events, VR Blog | No Comments

Congratulations Dimity in QLD – Winner of the Visual Resource competition.

Partnering with RenoExchange, Visual Resource offered one lucky entrant the opportunity to win a custom VR Art Glass splashback, or VR Photo Artwork up to $2,000 in value.

We were delighted with the response of the competition, which proved to be one of the most popular prize offers RenoExchange has offered to date.

Thank you to all who entered.  Unfortunately there can be only one winner.  Once again congratulations Dimity – Michael and I look forward to working with you to create your custom artwork.

Competition image for BLOG

The best of both worlds – art for your wall, or art for your kitchen.

Home renovation underway… finally!

Posted by Toni Collins | Renovation, VR Blog | No Comments

After a few more delays… we are excited to report our renovation works have begun!  Step one – the removal of our ugly duckling splashback. 

Beige Splashback Pre Removal Visual Resource

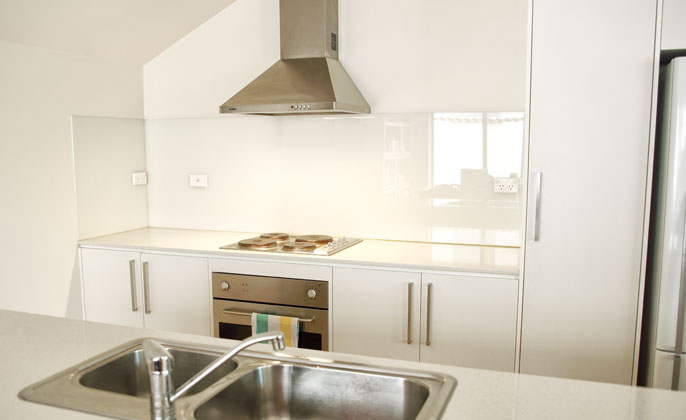
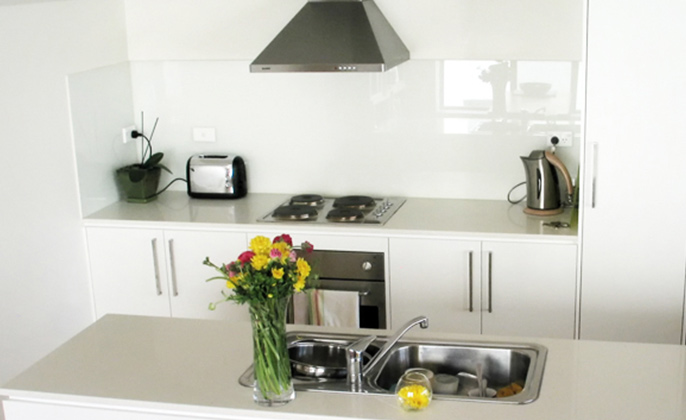
Existing splashback – ready for removal


Question: if I have an existing splashback, do I have to remove it before putting in the new one? 

We are often asked this question, and the answer is, “you do not necessarily have to remove your existing splashback.”  The option to simply put the new splashback over the top of the existing one – is one possible option.  There are a few things to consider – before deciding.

When leaving your existing splashback, and putting a new one on top – considerations include:

1.     Will you be happy with your final splashback depth?  Picture the depth of your new splashback (from the wall).  It would be the depth of your existing splashback plus another 8-10mm.  Will you be happy with the extra thickness of your final splashback?

2.     Is the existing old splashback surface reasonably flat?  Ideally the surface will be quite flat and even.  But even if it is a little wonky (with uneven tiles for example) – fitting a new splashback over the top may still be possible.  Our Glazier could evaluate the existing surface, and make a recommendation.

3.     And finally, in terms of compliance with regulations: where you have a gas cook top, the distance between the face of your new splashback, and the edge of the heat source (gas burner) will need to be not less than 140mm.   This aspect may be the determining factor influencing the removal of the existing splashback.

For us… we did not ponder the ‘considerations’ at length.  There was an unspoken understanding that the existing splash – had to go.  After all, it has served 7 years; it has done its time.

Splashback-removal Visual Resource

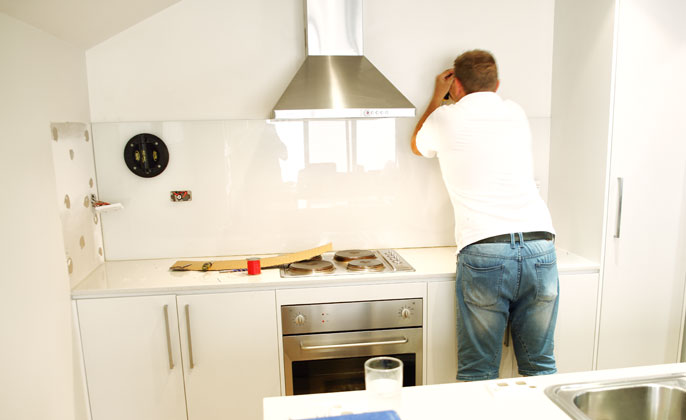
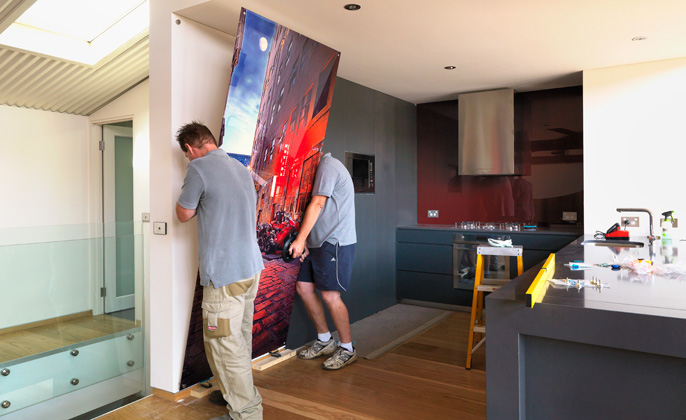
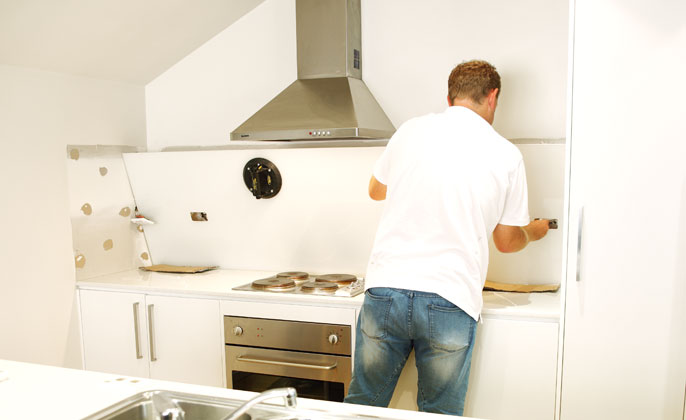
A longer blade (mini saw type tool) was pushed behind the splashback.


The removal – how was it done?

(Please note: we recommend this is a job for a professional, who is familiar with Toughened Glass.  We write the steps here – just for interest.)

  1. The silicone seal all around the edge of the splashback was cut with a blade.
  2. Power point covers were removed, and then power point fittings were unscrewed and pulled out from the face of the splashback slightly.
  3. The attachment between the wall and the top of the splashback was broken.
  4. A longer blade (mini saw type tool) was pushed behind the splashback, to cut some of the adhesives (silicone blobs) holding the splashback firmly in place.
  5. Some fishing wire was also used to slide between the glass, and the wall – aiming to cut through some more silicone blobs.   (Not all – just some.)
  6. After prising the splashback away from the wall at the top (just a touch), then with the assistance of a second person and a suction grip – the panel was gradually manoeuvred away from the wall.  Remarkably – in one piece.  The end!
  7. Our Glazier Jasen was doing the grunt work (and it was hard yakka getting the glass separated from the wall).  Having professional assistance is certainly our recommendation.
Splashback-removal Visual Resource-2

The panel was gradually manoeuvred away from the wall.


Next Steps

On Thursday this week… we anticipate the electrical works and cabinetry installation will begin.  Exciting times ahead!

Toni

Splashback-removed Visual Resource

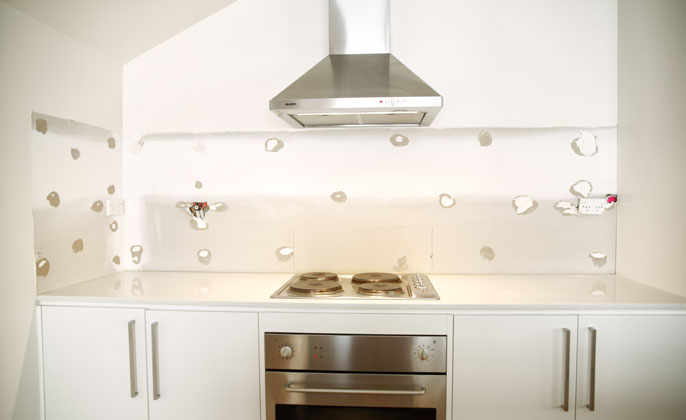
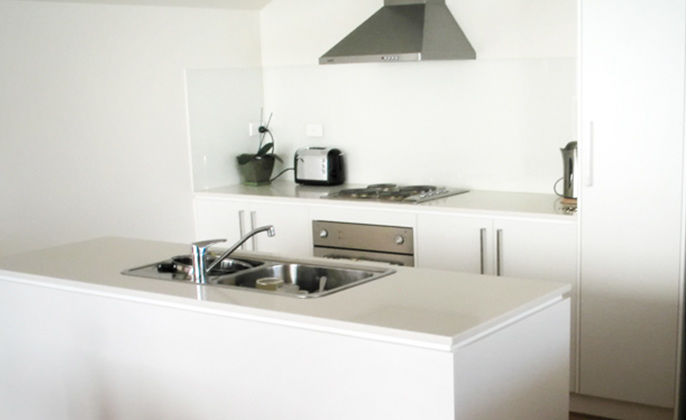
Former splashback gone. The kitchen is now ready for a face lift.

Holiday Musings

Posted by Toni Collins | Travel, VR Blog | No Comments
VR-blog-VINTAGE HOUSE-dining

Vintage House – a Victorian miners cottage originally built around the 1860’s.
Interior created by Kali Cavanagh.

VR-blog-VINTAGE HOUSE-composite

The perfect marriage between old & new.
Vintage pieces with patina, texture and a story to tell… combined effortlessly with new luxury linens.


Our break this year included a few days getaway in Hepburn Springs / Daylesford. 

Upon arrival the charm of the impeccably appointed Vintage House was immediately calming, imploring a retreat from the thoughts and demands of life.   We were delighted to find there was something for everyone: Michael started snapping away on his I-Phone, his visual appetite more than satiated by the stunning interior, I started thumbing through the many wonderful books and magazines, mesmerised by, ‘a life less ordinary – interiors and inspirations’ by Zoe Ellison and Alex Legendre, and Roisin scampered about exploring everything – her imagination running wild!

A little more about Vintage House:

A Victorian miners cottage originally built around the 1860’s.  Situated directly on the border of Daylesford and Hepburn Springs in Victoria.

The antique, vintage, industrial furniture and lighting has been sourced with love specifically for the house, from all around the globe, including – USA, UK, France and of course Melbourne along with tailor made furniture and pieces throughout.  Including:

  • Chesterfield sofas and bench seating
  • Antique cast iron fireplace surround from 1800’s France
  • Dining table from an old post office – late 1700’s England
  • Chambers Gas Stove from USA
  • Vintage Artwork from France
  • Vintage French linen cushions
  • Old wooden railway bench seats

Are you starting to get a vintage-industrial picture in your mind?

And being on holiday… a good night’s sleep is essential.  Not hard to accomplish on the large, comfy bed, fitted with beautiful linens chosen from Matteos – Los Angeles.  (Sorry to brand drop… but I suspect the linen selection was highly considered by the Interior Designer, and it was a new experience for us to sleep on actual linen sheets!)

The style ‘vintage – industrial’ is not one I have a natural affinity for.  To create a space styled like it would be quite beyond me… Perhaps that is why I enjoyed the home so much?  I found the marriage between old vintage pieces, and the comforts of new luxury linens and fittings so calming and pleasing to the senses.  I admire the skill and creativity of the Designer who did composed this very fine space – Kali Cavanagh – hats off to you!

Home renovation project…. more ‘before’ shots

Posted by Toni Collins | Renovation, VR Blog | No Comments
Cupboards-blog

More ‘before’ shots.
Yes, this is what our cupboards look like – all four of them.


You may recall… I mentioned our project was due to commence in November… 

Well… November came and went, and the kitchen remains a beige beauty awaiting a face-lift.

Perhaps some slippage in the schedule, a few unexpected delays here and there, is all just customary and an essential part of the renovation ‘experience’?  If this is the case, our project will be no exception and is running perfectly to script.

On the bright side – this presents an opportunity to ponder in the ‘before’ a little longer, revealing the internal machinations of our kitchen.  Yes, this is what our cupboards look like – all four of them.  (Please note: no special attention has been given to the styling, in order to dramatise or misrepresent the severity of the situation.  They really are that cluttered and dysfunctional.)

And as for the food pantry… there may be cans of soup up the back, first acquired in 2006.  It’s possible!  (I am really not sure what is going on back there.)

So what is happening next?

As of Monday Nov 25th materials arrived for our Carpenter to start fashioning these materials into something to transform our kitchen.  He is working away in his factory and around Dec 10th is when the installation at home may commence.  I will keep you posted… but those ‘after’ shots are not likely to be available until the New Year.  Sorry to keep you waiting.

Toni

Pantry-Blog

The food pantry.
There may be cans of soup up the back, first acquired in 2006. It’s possible!

Announcing a new collection of artworks – ‘Colour Flow’

Posted by Michael Collins | Collections, VR Blog | No Comments
Visual-Resource-Colour-Flow-8

Colour Flow # 8


A collection of photographic artworks created using the technique known as ‘Painting with Light’.

‘Painting with Light’ – the creative process

The works created by Michael Collins present a vibrant celebration of colour and form.

Achieved using the photographic medium to paint images – using an exploration of three elements simultaneously: colour, movement and light.

Each image is created in camera, with a single exposure.

This is an important point.  The images are not created on a computer.  The creation of the image happens during a single in camera exposure.  The design and colour harmony of each image is considered and created – during the moment of capture.

About this Collection – ‘Colour Flow’

Inspired by the warm colours of a summer sunset.

Each image is achieved by the choice of colours and their careful placement within the composition.  The inspiration was to replicate the feel of rolling hills disappearing in the late afternoon light.


Visual-Resource-Colour-Flow-11
Colour Flow # 11


Visual-Resource-Colour-Flow-19

Colour Flow # 19


What sort of splash back do you have?

Posted by Toni Collins | Renovation, VR Blog | No Comments

As a result of our work we are privileged to be invited into people’s homes, to play a small (yet productive) role within the disruptive process of home renovations, or new home builds. I recall meeting with a client earlier this year as we discussed artwork options for her new kitchen and she asked me, ‘what sort of splash back do you have? It must be good’. My answer was, ‘…a very ordinary one… in fact, it’s quite shameful.’ I am nothing if not honest… but you be the judge… what do you think of our kitchen? (Seen above.) While I can share case studies, showing kitchens we have provided VR Art Glass for – which look lovely, our own kitchen is only suitable for the ‘before’ shot.

Well that is soon going to change! Enter Interior Designer Patricia La Torre of Outside Inside Building Elements.

When we first met Patricia to discuss our home improvements project, our two main concerns were: storage is difficult, and home is not comfortable to live in. Being a good client, I had a brief prepared, and I wrote, ‘we love where we live, and appreciate the many positive attributes of the space. We would however like to make better use of our space and add some design features which will increase the comfort and aesthetic enjoyment of our home.”

Patricia set about designing a very exciting kitchen and living area renovation. And before making selections for the finishes of cabinetry and benches, Patricia wanted our artwork choice for the splash back. Once deciding on Elements # 17, this piece provided an inspiration source for Patricia to recommend finishes and colours for the entire renovation.

The photos show you our kitchen now – the ‘before’ shot. The installation of our ‘home improvements’ project is due to commence in November, so we will share the ‘after’ shots in the very near future.

Toni

O'ShanassyStsmall2V2

Our kitchen today

Kitchenmainwall

New kitchen & living area design by Patricia La Torre of Outside Inside Building Elements.The refreshed kitchen will feature VR Art Glass – Elements #17 design.

Kitchensidewall

Kitchen Side Wall

material_board

Material board showing our finishes for the new kitchen.